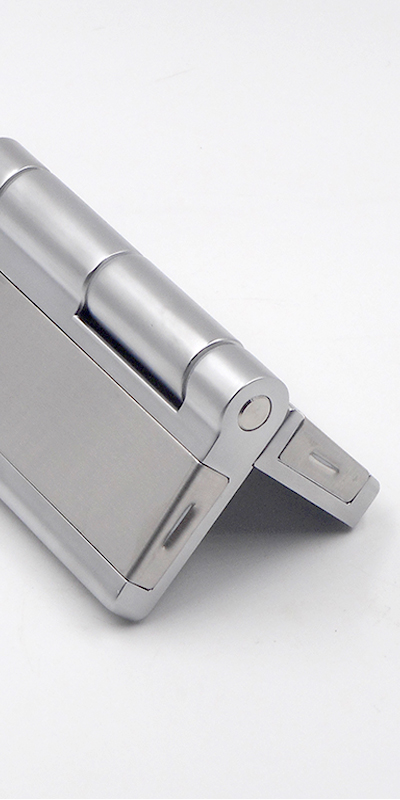
In today’s world of transportation, a trailer gate is an essential tool. It’s the barrier that safeguards goods, ensuring they’re transported securely. But this gate is only as good as the hinges that support its movement, which often face the brunt of the wear and tear.
Making Hinges for trailer gate involves selecting durable materials like heavy-duty steel, designing the hinge based on the trailer gate’s measurements, and utilizing tools such as an angle grinder and welding machine for shaping and attachment. Once created, the hinge is attached to the trailer, ensuring a secure fit and smooth operation. Regular maintenance, like oiling and inspecting for wear, ensures the hinge’s longevity and efficient performance.
Now, if you’re curious about how to make these pivotal components, stay with us as we guide you through the steps.

Understanding the Material Needs
Selecting the right material is the first step in our hinge-making journey. Typically, heavy-duty steel or stainless steel is the go-to choice due to its durability and resistance to corrosion. The type of metal you choose needs to withstand the challenges posed by varying weather conditions and the weight of the trailer gate.
After settling on the material type, you’ll need to determine its thickness. This decision largely hinges on the weight of your trailer gate. A thicker, more robust material will be required for heavier gates, ensuring that the hinge can support the gate’s movement without faltering.
Necessary Tools and Equipment
Before diving into the creation process, gathering the right tools is paramount. Your workshop should be equipped with a reliable metal cutting tool, like an angle grinder. This tool will be instrumental in shaping the hinge to its desired size.
Additionally, if you’re opting for welded hinges, a welding machine is non-negotiable. Other essentials include a drill for making screw holes, a measuring tape for precise measurements, metal files for smoothening out edges, and of course, safety gear. Quality tools don’t just ensure accuracy; they protect the craftsman during the making process.

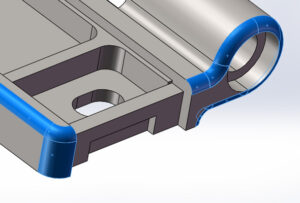
Design and Measurement
Designing the hinge starts with visualization. Sketching your envisioned hinge can give clarity, ensuring all aspects, especially crucial ones like the pivot point, are factored in. An accurate design minimizes errors and ensures the finished product aligns with your trailer gate’s needs.
Once the design is finalized, the next step is to translate these visual measurements into actual dimensions. Measure the trailer gate and determine how many hinges are required and their size. This process is foundational, ensuring the eventual hinge aligns perfectly with the trailer gate.
Cutting the Metal
With measurements in hand, it’s time to bring the hinge to life. The angle grinder will be your primary tool here. Cut the metal with precision, ensuring each piece aligns with your predetermined measurements.
Post cutting, the edges of the metal may be rugged or sharp. This is where the metal file comes into play. Smoothen out these edges, ensuring they’re safe to handle and won’t cause injuries during installation or operation.

Shaping and Bending
Hinges, depending on their design, may require bending or shaping. Employ a metal vise and hammer for this task. When bending the metal, ensure consistent pressure to achieve a uniform bend. This consistency is crucial for the hinge’s performance and aesthetic appeal.
Drilling and Preparing for Installation
The hinge, once shaped, is almost ready. But before it can be attached, holes for screws or bolts need to be drilled. This drilling should be done with precision, ensuring the holes on the hinge match those on the trailer gate, paving the way for a seamless fit.

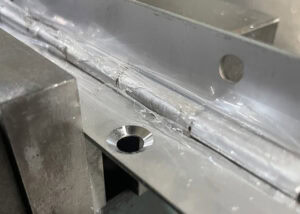
Welding the Hinge
Welded hinges offer a sturdy attachment, ensuring the hinge remains firmly in place even under strenuous use. Attach the hinge to the trailer gate at the predetermined points and weld securely. While it’s essential to ensure a strong bond, be wary of over-welding, which can lead to warping of the metal.
Testing and Fine-Tuning
With the hinge installed, it’s time for a trial run. Open and close the trailer gate multiple times, checking for smooth operation. Should there be any snags or disruptions in movement, it might require some fine-tuning or realignment.
Maintenance is a continual process. Just because the hinge is installed doesn’t mean the job is done. To ensure longevity, occasional oiling is essential, especially to ward off rust. Regularly inspect the hinge for any signs of wear and tear, addressing minor issues promptly to prevent major complications down the line.
Conclusion
Crafting a hinge for your trailer gate is a meticulous endeavor, but the result is a custom component tailored to your specific needs. With the right tools, materials, and a bit of patience, you can create a durable and efficient hinge that stands the test of time.
You might also be interested: